
#TGIFC117 Summer Blues in Country Hues!

Summertime blues is the theme for this week's TGIFChallenges #TGIFC117. I wanted to feature the Heartland stamp this week. I wanted some summer blues in country hues. I grew up in the city for the most of my life: first in India, then Virginia and now I'm in Rhode-Island. I'm learning what the country living is all about. While I enjoy the beautiful outdoorsy summer, I just wanted to make a card my husband and some local friends can relate to. But this stamp really speaks to me about a certain 7 year old nephew of mine who does the horse chores and farm bidding with so much passion and discipline that I think I'll surprise him with this card.

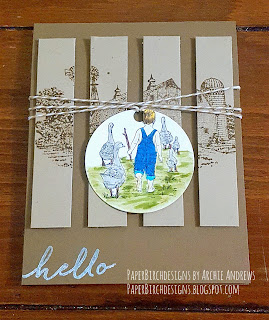
To make this card, I cut out a piece of soft suede card stock 4.5" x 5.5". I used crumb cake card stock 4" x 3" and stamped the back barn image on the piece of card stock. Then I cut up the card stock in 4 pieces .75" each to give it a deconstructed look. I wanted to add a pop of blue for the summer blues.
Enjoy this heartland stamp, it really is for all the country lovers out there! Hope your summer has had just the right amount of color as mine!

Order this stamp today through my Stampin shop link! As always, don't forget to subscribe if you already haven't so you don't miss any future related posts!


Product List

Comments

  1. Such a gorgeous card! Love the split panels across the back of the card and then the focus image in the circle in the front. Barefeet, outdoors and fun just scream summer to me. Thanks for playing along and supporting us this week at TGIF Challenges. Rochelle xo

    ReplyDelete
  2. This is really beautiful!

    ReplyDelete

Post a Comment

Popular posts from this blog

Organized Card Giver Post #2: Prepare to Succeed!

Hey everyone,  If you’re reading this post, it means you’re somewhat serious about the New Year’s resolution to send cards to people you care about. Do me a favor and give yourself a quick pat on the back from me. Starting is half the battle.  Actually, it’s more important to start, than to succeed. People that start something are usually the ones that end up finishing strong. I tend to procrastinate, just like everyone else. But, just like with anything, if I tell myself, just start….just run for 5 mins, just workout for 5 mins, just clean for a minute, I build momentum to keep going forward. Then when the time is up, its not so bad. You can keep going more… That’s exactly what we’re going to do this week. We’re going to start strong. That’s all you need to do for this week. I know the New Year’s doesn’t start until a month from now, but we want to actually hit the ground running as soon as the new year hits. So, preparation is the key here. For this week#1, and...

Diy Popcorn Box for a Movie Night or a Movie themed Party

Smartfood popcorn and regular popcorn have become a necessity in our household. In my household, we don't just Netflix and chill. We Netflix and chill and snack! You have to date night with a purpose and cuteness. Check out this popcorn treat holder. I used stampin up thinlits and stamps to make this cute popcorn holder.  Stampset: Ready to Pop PhotoPolymer Stamp Set - $16.00 Item Number 141513 Thinlit: Popcorn Box Thinlit Dies -$33.00 Item Number: 141473 To purchase these stamps/thinlits click Shop Now: archieandrews.stampinup.net Instructions:  1. Cut out the paper width of the thinlit. You will be making 2 of these cut outs to make 1 popcorn box holder.  2. If you want to scallop the edges of the box, use the scallop thinlit on top edge of the popcorn box. This step is optional based on your personal preference.  3. You will need two of the these to make 1 popcorn box.  4. Now comes the fun stampin/embell...

Transform Your Crates With A Distressed Look

Happy Monday everyone! Let's start out the week with something to look forward to. I don't know about you, but I always enjoy planning for a project and looking forward to doing something creative. You ever have any projects that you have been planning for a while? This past weekend, Ray and I, worked on a DIY project that we had been talking about for a while. It finally happened, and it was oh so rewarding!  We tranformed our crates and gave it a grey distressed look!  Instructions: This is the before picture! The crates are just your ordinary run of the mill crates, that I got from Michaels. You can get your wood or crate of choice that you would like to distress.  Start with a Dark Walnut Stain ( Minwax Woodstain 2716). Coat with the entire crate/wood with the stain. Use a rag and wipe the excess stain. The longer you keep the stain, the darker the grey stain, and less you keep the stain, the lighter grey it will be.  Take a r...